Monday, 3 December 2012

Illamasqua Leeds Beauty Drop In

On Sunday at the Illamasqua store in Leeds there were running a free beauty drop in. I went to see the Very Berry Christmas Make up.


The Leeds store is quite small and then you go upstairs for the session. It was very busy I had to stand at the back, but I still got a really good view as it was a very small room.


It was amazing how many different ways their medium pencils could be used. On the above make up the  artist showed it blended into the socket line of the eye. Used it to contour the cheeks and also to outline the lips. I liked the idea of their pencils so much I bought one to try out. 

Another really interesting part was the eyebrow work they did. The artist filled in the eyebrow and then highlighted the area around it with a light concealer. It was incredible how much of a difference this made.

The artist explained why Illamasqua do not use SPF in their foundations. The reason for this is that it reflects too more under lights when take high definition photos.

I hope they run more beauty drop in sessions in the future.


An Cafe at London - My Nails and make up

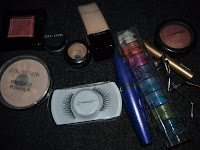
On 7th November I traveled to London to see An Cafe play at the O2 Islington. I had forgotten how organised you have to be when trying to pack light. Below is the make up I chose to take with me.

I know not much make up there right!


Above is the nail design I went with. I chose to go with blue as the tour was for the album Amazing Blue. The Grey base under the stripes was by Mavala, the blue glitter OPI and the white  lines Model's Own Nail art pen.


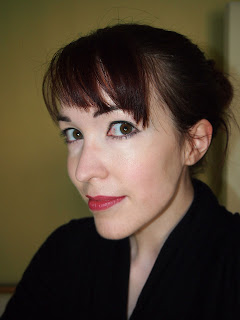
This photo isn't very good of my make up as I only had my phone camera. I used false lashes on my bottom and top lashes for a stronger look. The hotel  room was painted orange which didn't help either with the lighting.
My top is from a Japanese brand called Putumayo.

An Cafe were really good live, so happy and the band members looked so cute.

I went shopping in London and made it to Charles Fox and Screen Face, below is what I bought.
I got some eyebrow wax, so hopefully I can use these to block out eyebrows. I could have spent loads in those shops so much make up to chose from. SFX, body paint, glitter, brushes, eyelashes, eyeshawdows bags e.t.c


Sunday, 18 November 2012

Curly Bun Hair Piece Review

I order two hair pieces off Ebay from amashop2010. I have never ordered from this shop before. The ordering was easy and it arrived within 2 weeks. The product its self is good quality and not to shiny, as some cheap wigs are very shiny.
The hair piece I tried out today is pictured below. It was £11 with free posted.
This hair piece can be wrapped up as a curl bun and as a ponytail, the colour it mixed brown by Clair Beauty.

Bun

Lose bun

Here is an close of the bun for you to see the colours of the hair piece. This is a really quick way to have a stylish bun and to dress it up more add hair accessories such as bows, flowers etc.

Below if a different make up look I have been trying with dark lips. I used a lip liner all over the lips to give a long lasting matte look. It's amazing how different the face looks with darker lips than eyes. I think it makes me look older, maybe its having my hair up as well.


Sunday, 11 November 2012

Dark Blue Smokey Eyes

This is the make up I chose for going out for a meal with my friends at Bistro Saigon in Ilkley. Bistro Saigon serves Vietnamese food which is quite spicy. I found this out by accidentally eating a bit a chill! Whoops

Here is how I created my look:
  • First I used Illamasqua base with Mac strobe cream mixed in. Doing this changes it into an illuminating base. 
  • On under eyes I used Mac's Studio Finish Concealer.
  • I only applied powder to the eyes to help the eye make up last, as I wanted to keep the base shiny.
  • Using the True Colours pigment stacker in Eastside I used the white all over the eye lid, going up to the brow .
  • Use the dark blue on the outer corner of the eye and along the socket line. Blending into the white, winging it out slightly at the corner.
  • I used Bobbi Brown's gel line in black on top lash line and outer corner of bottom lashes.
  • Next curl eyelashes and coat with your chose black mascara.
  • For the fake lashes I used Mac's, there's no number on it to tell you which ones they are.
  • Use a highlight on the cheek bones, I used Illamasqua's cream blush on Lies.
  • On the actual cheek I used Mac's Mineralize blush in Gentle.
  • I used Fearne Cotton Lipstick on the llips (I had this in a big set as a present), this is a nude colour.


I curled me hair using straighteners, which I'm slowly getting better at. To protect my hair from the heat I used L'oreal Studio Hot Curl spray. To set the hair I used Schwarzkopf Silhouette hairspray. I like this Hairspray as its not strongly perfumed, brushes out easy and gives shine to the hair as well.


Wednesday, 31 October 2012

Halloween Nails dripping blood


Happy Halloween!
I had fun creating these nails, so i thought i would share with you how I did them.


First I used a base coat, then two coats of Nails inc Floral Street.

Next I chose a vivid red for the blood, this takes some steady hands to draw on. Start from one corner working towards the other. That's the method I found best.

Using Models Own nail art pen in black, I draw around odd bits of the blood.

Went until it's all dry and finish with a top coat.


Monday, 22 October 2012

Black Glitter Acrylic Nail Tips

I haven't done acrylic nails for a few years, but I wanted to get back into creating nail art. So here is one of my designs using A.S.P system. This brand of acrylic can be bought from Sally Express.


The consistence for this acrylic system was allot runny then the Creative Nails Acrylics,  its going to take me a little while to get used to. Everyone has to start some where.


The black nail tips are only cheap ones, but so far they have lasted on for a week and half. I used the silver glitter from the A.S.P Glitz and Glamour set and A.S.P clear acrylic.

A good tip for nail extension if you don't already know it, is to rub oil into the nails everyday to keep them moisturized. 


Sunday, 14 October 2012

Every Day Lilac Eyes


This is more of an every day look and i didn't have allot of time before i went out shopping.

I got to try out my new foundation Illamasqua Light liquid Foundation in 120. The colour was a good match but it seemed to go on patchy on my skin. Maybe my skin was a little dry that day with the autumn weather starting. This foundation would be better for people with a normal to oily skin type.
I used concealer under my eyes and on cheeks. 
I used Mac's Pigment in white frost all over the eyes. You may have noticed by now I like shimmery eyes best.
On the lid I used Urban Decay's eye shadow in Asphyxia and Urban Decay's Underland from the Alice in Wonderland palette in the socket line.
Line the bottom and bottom lash line with black eye liner. I like using gel liner's on the top lashes with a eyeliner brush and eye pencil on the bottom.
I coated my eye lashes with a black mascara before applying false lashes. 
The lashes I chose today was Eylure Naturalites 070.
On my lips I used Vaseline rosy lips.

Below are some photos I took in Bradford of the lights set up in the city park.


Sunday, 7 October 2012

Soft Green Eyes

This is from a make up look I did for last weekend. I wanted to go for a warm looking eye, as its been such dull weather outside. So here is a soft green eye make up.


  • First I used Bobbi Brown's moisture rich foundation in Alabaster. I like the shine this gives my skin, which is on the dry side. 
  • Under eyes and blemishes I used Illamasqua's concealer 115, applied with brush and fingers.
  • I then used Collection 2000 pressed powder. I only use a cheap powder as some of the more expensive ones are too heavy and cakey looking.


  • To highlighter the cheek bones and nose i used Illamaqua's cream blusher in lies.
  • Under cheekbones I used Mac's mineral blush in warm soul. 


  • First I applied Mac's pigment in frost all over the eye lid up to the eyebrow.
  • Next I used the light gold colour circled in the Lancome pallet in the inner corner of my eye, to make it look bigger.
  • Over the lid I used Mac's eye shadow in Lucky Green. 
  • In socket line I blended in Mac's Pigment in emerald green.


To line the top lids I used Bobbi Brown's gel liner in Black. Two coats of Max Factor's False Lash Effect Mascara in black. On bottom lash corner I used Urban Decay's black eyeliner.

To finish off I used false lashes on upper lid which I brought from a shop called Bodyline in Japan. Lips were coat with a pale lip gloss.


Random photo
Below is a photo of Button the cute guinea pig, she has the craziest hair. I wish my hair shined like hers!


Sunday, 30 September 2012

Blackberry Nails with white spots


I decided to go with dark nails today after seeing all the Gothic looks in Elle magazine this month. My design turned out well so I thought I would share it with you all.

1. First I used Revlon's Base Coat
2. I applied  2 coats NO7 Speed Dry Nail Colour in Blackberry. This is a lovely deep colour. If you make any mistakes, just use a cotton bud with nail varnish remover on.
3. I used the metal tip of Model's Own Nail Art pen in white to make the dots. 
4. Apply a top coat after the other layer has had time to dry. You don't want to smudge all your hard work.

Another easy design shared


Friday, 31 August 2012

Mint Green and White Spot Nails

I've been trying out more nail art, this time I actually had a model. Here is a picture of the result.


Sorry about the lighting in this photo I'm still getting used to my new camera.
  • First apply a clear base coat, I used Revlon's
  • I then applied two coats of Models' Own nail varnish in mint green.
  • Next I used the metal tip on the Models Own nail art pen in white to make the dots.
  • Give this a few minutes to dry and then use a top coat.


Sunday, 19 August 2012

Lilac half moon nails


How I created these nails
  • First Apply a base coat, I used Revlon's. 
  • Next apply two coats of Model's Own Lilac Dream polish.
  • Using Model's Own nail art pen in white draw a half moon in white with the fine metal end.
  • Next fill in the half moon with the brush end of the nail art pen.
  • Leave dry for 5mins and then finish off with a top coat, I chose to use one be Sally Hanson.


Jemma Kidd blue Eyeliner

This months Elle magazine comes with a free Jemma Kidd eyeliner, I got the blue one free with mine. The colour of the pencil looks looks much dark than it comes out. Nice soft pencil with smudger on one end.

I was feeling summery so I tried this eye liner out with the girly soft look.


Above are the products I used for this look.

  • I didn't use foundation just concealer by Illamasqua, colour 115  and powder. 
  • On the eyes I used MAC's Frosted white pigment all over the eyes. 
  • On the lid it self I used Illamasqua Creme eyeshaow in Crumble. I applied this using my fingers.
  • I used the Jemma Kidd eyeliner on top and bottom lashes.
  • Finally finishing off with a black mascra, I used Max Factors False Eyelash Effect.
  • On the cheekbones I used Illamasqua Creme blusher in lies.


I've been trying to look more girly recently so I chose a pink hair bow to go in my hair lol ! Its from Baby the Stars Shine Bright.