Sunday 20 October 2013

Easy Halloween Nail Art


These Halloween nails are really easy to do. All you need is:
  • Base Coat 
  • White Nail Varnish
  • Black nail art pen
  • Red nail varnish
  • Top coat
  1. First paint your nails with a base coat.
  2. Paint two coat of white nail varnish  

  3. For the ghost paint black squiggly lines on the tip of the nail, then two dots for the eyes.
  4. For the ghost mouth you can either fill it in black of just leave it as a black outline. Both ways look good.
  5. For the blood drips on nails, get the red polish and paint on the edges of the nails.
  6. For the Cobweb use the black nail art pen. This isn't that easy to do if you have small nails like mine.
  7. Let your design dry and then paint with a top coat, to help it last longer.

Hope you have a fun Halloween! 


Sunday 13 October 2013

Nail Art Stamping - Konad Set C review

Not put a post up in so long.........
Recently I've been hearing allot about nail stamping and particularly the brand called Konad. After looking at some reviews I decided to buy Set C off Amazon which cost £7.90.


I put on two coats of Model's Own nail varnish as a base and gave this time to dry.


I used the white Konad nail polish on the bow design. Then used the scraper over the imaged. This takes a while to get used. You can see the mess I made above.! But don't worry it comes off the plates with nail varnish remover. 
Then roll the stamper over the bow. Roll the stamper on the nail. It's a simple process but takes a while to get the technique right. I found it took a little to get used to where it would appear on the nail.

Here are the results :)

Pros-Great for people who are not good at free hand nail art. You can layer up images on the nail. I found it lots of fun to do. 

Cons- Takes a bit a practice and you need to clean the plates after every use.


Saturday 4 May 2013

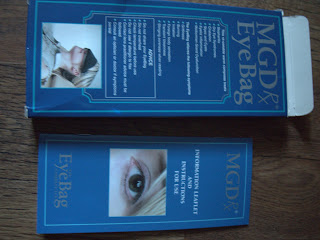
Eye bag Review for dry eyes

I've been having problems with my eyes being dry. The optician told me to use a hot flannel on my eyes and massage along the lash line. I did some research on line and I discovered the Eye Bag by the Eye Bag Company. This is basically a hot  Wheatie  for your eyes. Before buying this I saw that the reviews on Amazon looked quite good. So I thought it was worth a try.


The eye bag is really easy to use just put in the microwave for 30 seconds and then put on your eyes for 5mins, twice a day. Check the heat before you put it straight on your eyes.
After using this for a week I have found that my eyes do not feel as tried at the end of the day as they used to. This is good for me as I use computers all day for work.
The only bad thing about this product is that you have to balance it on your eyes, it would have been better to have a strap on it, to put around your head.

Tuesday 16 April 2013

Spring hair fishtail plaits with wavy hair

Just a quick post to show my spring hair style. I wear plaits in my hair allot but this time I thought I would try out fishtail plaits. I curled the rest of my hair with straighterners. Don't forget to put a curl heat protective spray on you hair before you curl it.
Here is what it looked like


Saturday 23 March 2013

Ardell False lash review and red eye make up

I brought Ardell Fashion lash 118 from Sallys beauty wholesalers. I chose these lash for extra volume and length and they only cost £2.39.
The other lashes by Liz Martins in the picture I used on the lower lashes these are also from Sally's.


  • For the make up base I used Illamasqua's Light liquid foundation in 120 with no powder to keep the dewy finish.
  • On the under eyes I used Clinique Airbrush Conclealer in 04 neutral fair.
  • To hightlight the cheek bones I used Illamaqua's Cream blusher in lies and used this along the nose.
  • On the apples of the cheeks I used Mac's Mineralize blush in warm soul.
  • All over the eyelids and up to the brow bone I used a glittery white eyeshadow.
  • All over the eye lid and all around the lower lash line I used Bourjois Rose Temntation. This helps the eyes to stand out.
  • I used Mac's pigment in basic red along the socket line and outercorner of the eye. Make sure you blend the edges of this eye shadow in well. Or it makes any mistakes more visible.
  • I then used a liquid black liner on top lash and black eye pencil on lower lashes.
  • This time I applied the up Ardell lashes before mascara, these went on with no problems. They felt light and comfortable to wear and gave a dramatic look. At the end of the night they were easy to remove. These lash are very good value for money and gave extra length and volume to my short lashes.
  • I applied mascara before putting on the bottom lashes. To make lower lash more comfortable stick them on just below the lash line.
  • I kept the lips simple with Glam Shine lipgloss Juicy rose glow by L'Oreal. 

Wednesday 13 March 2013

Barry M Textured Nail Paint review

When I was shopping last week in Superdrug I can across Barry M' s new nail textured varnish, which costs £3.99. I brought the light pink called Kingsland road which is a candy pink.

Here is what it looks like on your nails


Its quite a strange polish to paint on, when you first paint it on your nails it looks very watery and runny. I waited for the first coat to dry before i put the next on. When it starts to dry you can see the sand like texture come through.
You definitely need a second coat with this polish.
Over all I can't decided if I like this look or not, I think it would look better used as nail art rather than on full nails. It does seem to last well on my nails through which is a plus.

Sunday 24 February 2013

L'Oreal Ombre Hair colour review

I really like all the dipped dyed hair looks I have been seeing in all the magazines, over the last few months. So when I saw that L'O'real had brought out the Ombre hair dye I thought brilliant this looks easy to use.
This isn't the cheapest product at £6.99 and comes in three colour. I chose the Ombre in shade one as my hair is medium brown.
The colour was easy to apply the bleach gave a even colour result. The only thing was it didn't lighten my hair that well. I'm not sure if this was because of my hair having so many colours on already ( been dying it for years).
At first I was a little disappointment but know I love the fact its a subtle effect and have had lots of complements and looks great when its curled.
Any way here are the photo for you to have a look at.